Learn how to create and install your pixel, how to test events, and how to select optimum pixel settings.
Watch the VIDEO to get an idea and read through the page for more details:
Create a new Facebook Pixel
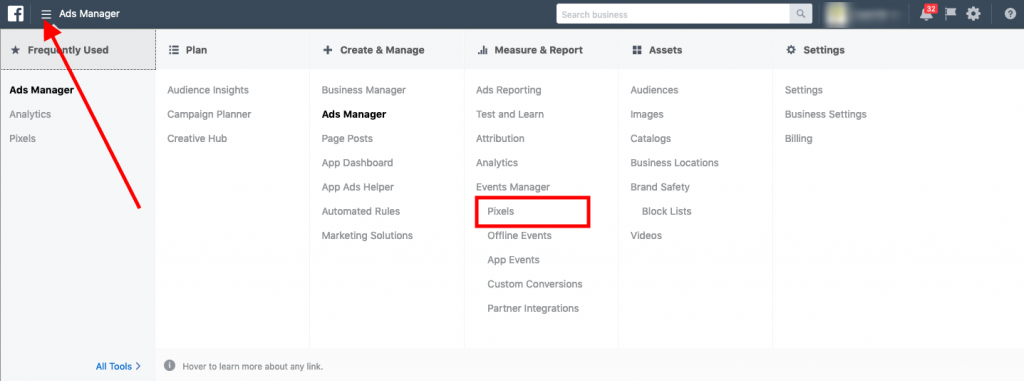
From your Facebook Ads Manager open the top menu and click on the Pixels link:
If you don’t have any pixel associated with your account you’ll be prompted to create one:
Click on the green “Create a Pixel” button.
Give your new pixel a name and click “Create”.
Your new pixel is now ready, and you can install it in your WordPress site using the PixelYourSite plugin.
Install your Facebook Pixel with PixelYourSite
In order to deploy the Facebook Pixel with the PixelYourSite plugin you just need your Pixel ID.
Copy the Pixel ID and open the PixelYourSite plugin. Paste the ID in the dedicated field and save the new settings:
That’s it, the Facebook Pixel is now installed on your website.
Important: if you use a cache plugin, delete the cache.
Test Events
You can test your pixel with Pixel Helper Chrome extension, or directly from your Ads Manager.
Click on the “Test Events” link and add your site URL in the dedicated field:
Click “Open Website” and start browsing it. If you run a WooCommerce or Easy Digital Downloads (EDD) store, you should do a test transaction. Click on links, comment, search, watch embedded videos, submit forms. These type of actions will trigger PixelYourSite’s Global Events.
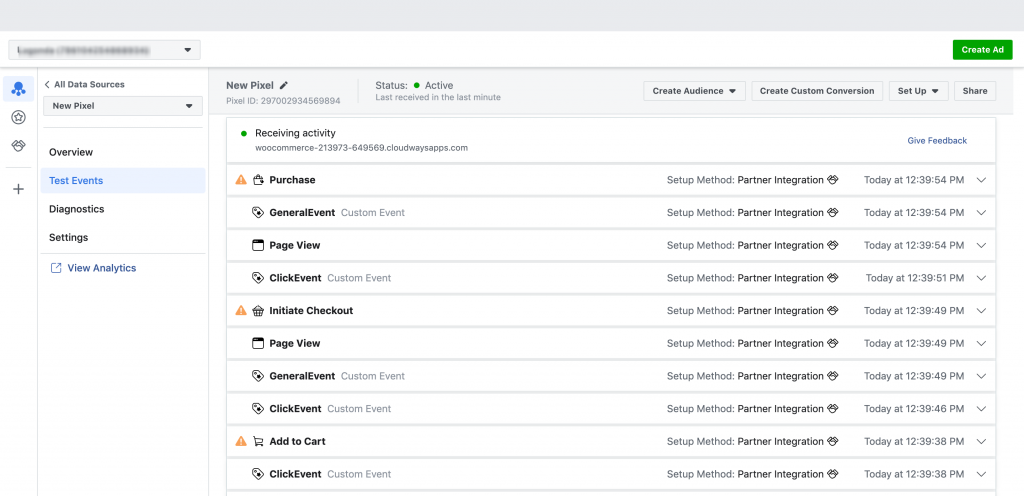
Once you’re done, go back to your Ads Manager. You’ll see a list with the events fired by pixel:
You can expand each event and see more details, like the URL where it was fired, parameters, and Advanced Matching Parameters:
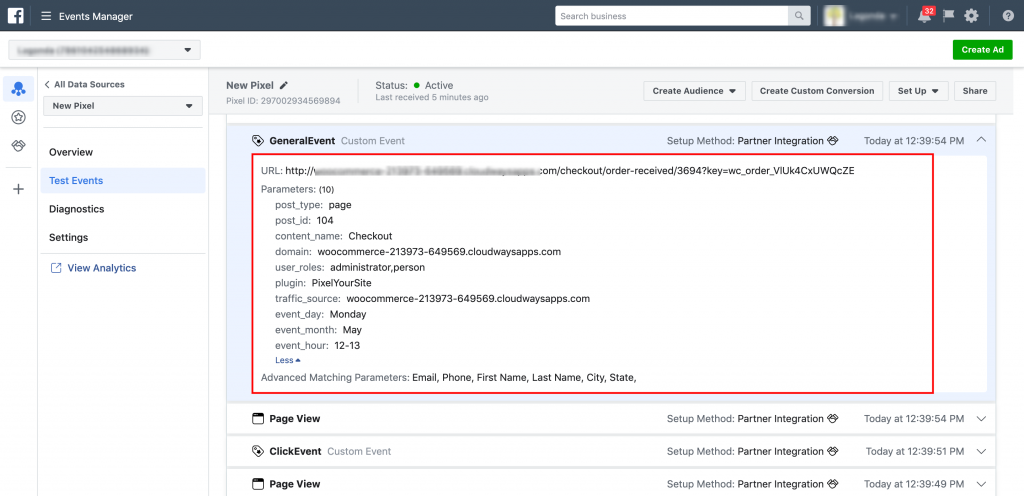
It’s possible to see some Warnings as well.
Pixel and Catalog Not Paired Warning:
The pixel is not paired with a product catalog. This can cause dynamic ads not to work properly.

This warning is shown for events that look dynamic ads ready (content_type is product or product_group and content_id exits), but the pixel itself is not paired with a product catalog.
Solution:
Create a Product Catalog and connect it to the same pixel ID you have on your site.
There are multiple ways of creating a Product Catalog. We offer a dedicated feed plugin that can help you.
You can find more on how to upload your products into a product catalog here.
Unmatched Products Warning:
The product ID provided by the event can’t be found in the Product Catalog. This can cause dynamic ads not to work properly.
This warning is shown when the pixel is paired with a product catalog, the event is dynamic ads ready, but the ID is not found in the catalog. Possible causes:
- the product was not uploaded to the catalog.
- the pixel and your product catalog use different IDs.
Solution:
Make sure all your products are uploaded to your product catalog and that both your pixel and catalog use the same ID logic.
You can find more on how to upload your products into a product catalog here.
Pixel Settings
On your Pixels page click on the “Settings” link from the left-side menu.
Recommendation: Turn Advanced Matching ON and keep the other default settings.
Details
In this section, you’ll find the pixel ID, creator, and owner:
Sharing
You can “share” your pixel with another Business Manager accounts, or other ad accounts.
There are two levels of access:
Standard: View and analyze Pixel performance in Facebook Analytics.
Admin Access: Manage Pixel. Create, edit, and view pixels. Add or remove pixel events. Create pixel audiences and conversion ads. Add, edit, and remove pixel users.
Pixel and Cookie Settings
In this section, you can control how your pixel will work.
Advertising and Analytics
By default, the pixel works for ads measurement, ads reporting and analytics.
This configuration lets you access advertising features such as audiences, conversions, targeting and optimization as well as site analytics and reporting data.
You can change it and use Analytics only. If you don’t run ads on Facebook, the analytics only option helps you understand your site traffic and view your site data in Facebook Analytics.
Why it matters: Depending on how you use your pixel, your legal obligations of informing your website users about cookie and asking for their consent might vary.
Cookie Usage
You can decide if your pixel will use first-party cookies.
Why it matters: Compared to third-party cookies, first-party cookies are more widely accepted by browsers and stored for longer periods of time. Using first-party cookies will improve your pixel tracking performance.
Advance Matching
The Facebook pixel relies on cookies to match Facebook Users to their tracked conversions. If your website visitors have cookies disabled, you can use the pixel’s advanced matching feature to include visitor data when the pixel loads.
There are two types of Advanced Matching:
Manual Advanced Matching: your pixel code must be modified to include the extra information. PixelYourSite can do this for you.
Automatic Advanced Matching: you don’t have to change the code, the pixel will try to identify this info by itself.
PixelYourSite sends Manual Advanced Matching in two situations:
- when a logged-in user visits your website.
- after a WooCommerce or Easy Digital Downloads transaction.
You can control Automatic Advanced Matching from here:
Turn Automatic Advanced Matching ON, and the pixel will look for things like email, phone, first and last name, city, state, ZIP, gender. Once a user shares this type of information with you, it will be used for Advanced Matching.
Important: you might need to inform your users that their data is shared with Facebook.
Event Setup
If you use PixelYourSite you don’t need to do anything here. Our plugin will automatically implement events for you and you can configure additional events from inside the plugin itself.
Track Events Automatically Without Code
Keep it OFF if you use PixelYourSite. If you turn it on, the pixel will start to associate actions with standard events and you can end up tracking the same thing twice.
Traffic Permissions
Control what websites can send traffic to a pixel. If the pixel is fired from unwanted domains, you can block them from here.