Have you ever been scrolling through your Facebook feed and come across an ad for a brand whose website you were just on the other day?
This isn’t creepy coincidence. This is remarketing – a very effective way of reaching people who already know who you are.
The process involves delivering ads on Facebook to consumers who have visited your website or taken specific actions on your website but who didn’t necessarily convert. The idea is that they will convert if they are exposed to your brand again.
What to Do to Run a Remarketing Campaign
Prepare Your Website With The Facebook Pixel
First things first, you need to set up your website for a remarketing campaign. The people you will be targeting are people who have visited your site, so you need to add a piece of code to let Facebook know who’s been checking you out.
Facebook used to have a designated Pixel specifically for remarketing, but it now uses the all-in-one Pixel. There are a number of different actions you can set it up for, but we’ll talk about that later on.
What does this code do?
This code tracks your website visitors by placing a tiny little pixel on your site that picks up users’ details. It can then tell what pages they visited and what actions they took while they were there, as well as:
- Track your ads and conversion value
- Create custom audiences for retargeting campaigns
- Optimize your ads by using different events as triggers
How to Get Your Facebook Pixel Code
Go to your Ads Manager and click into the Audiences section. Select the campaign you’re working on and click on Actions. From there, go to the View Panel in the drop-down menu.

You’ll then be able to get your Pixel code which you can insert on your website.

The easy way to install the Facebook Pixel: PixelYourSite plugin
With the PixelYourSite plugin, you just need the Pixel ID. Instead of having to find the place where your Pixel goes or hiring a tech person to implement it for you, the plugin is a one-click Pixel install that then allows you to track more unique events, create custom audiences, and set up dynamic ads without any need for complicated coding.
Its ease of use and advanced capabilities are the reason more than 30,000 people have used our plugin.
Setting Up Your Custom Audience
The next step is creating a custom audience filled with people who have visited your site.
Once you’ve got your Pixel set up and working, you’ll be able to create a list of people that it has been tracking, and new visitors will constantly be added to that list.
After a little while, you’ll have enough peoples’ data to start segmenting your visitors by the actions they’ve taken or their demographics or the products they’ve looked at. This makes it easier to target the right people and can laser-focus your remarketing campaigns for increased success rates.
The Best Audiences to Retarget
So, now you’ve got your Pixel on your site and you’ve got some website visitors. But how do you know which people to target with your remarketing campaign?
Firstly, think about your goal: do you want to sell more products? Create more awareness of your brand? Get more subscribers to turn into loyal fans?
This should fuel how you segment your custom audience. For example, if you want to generate more sales, you can target users who have looked at specific product pages on your site, or target those who have added something to their cart but haven’t moved forward to the payment stage (you can do this automatically with Dynamic Ads, more details down on this page).
Alternatively, if you want to generate awareness around your brand, you might want to target people who avidly read your blog.
Here are some of the best audiences you can retarget:
- Your existing customers – they know your brand, they already bought something, they are the hottest audience that you have. Make sure that you show them your latest products and offers. It’s a good idea do use the ads to promote a discount – they deserve it.
- Your avid readers – Using Custom Audiences > Custom Combination you can build audiences from people that read a minimum number of articles from your site in the las X days. If you want you can also go more specific, and target only some categories or tags (PixelYourSite plugin lets you do that with ease). You can hit this audience with offers tailored to their interests.
- Product visits in the last 14 days without a completed transaction – they are clearly interested in what you have to offer and they already know you. Make them an interesting offer, like a discount or free delivery to convince them. Adding an expiration date for this offer might increase your conversion as well.
- Your “About Us” page visitors – these are people that war curious about your organization and you should not ignore them. Try to experiment with this audience a bit, because it usually leads to some interesting results.
Pro Tip: Expand your reach by using Lookalike Audiences. Probably the most interesting audience to use for a Lookalike is the one based on your actual clients.
How to Start Your Remarketing Campaign
Now you have your Pixel set up, you know what your target is, and the segment of your Custom Audience that you’d like to reach.
Which means it’s time to actually set up and create the campaign.
1. Select Your Audience
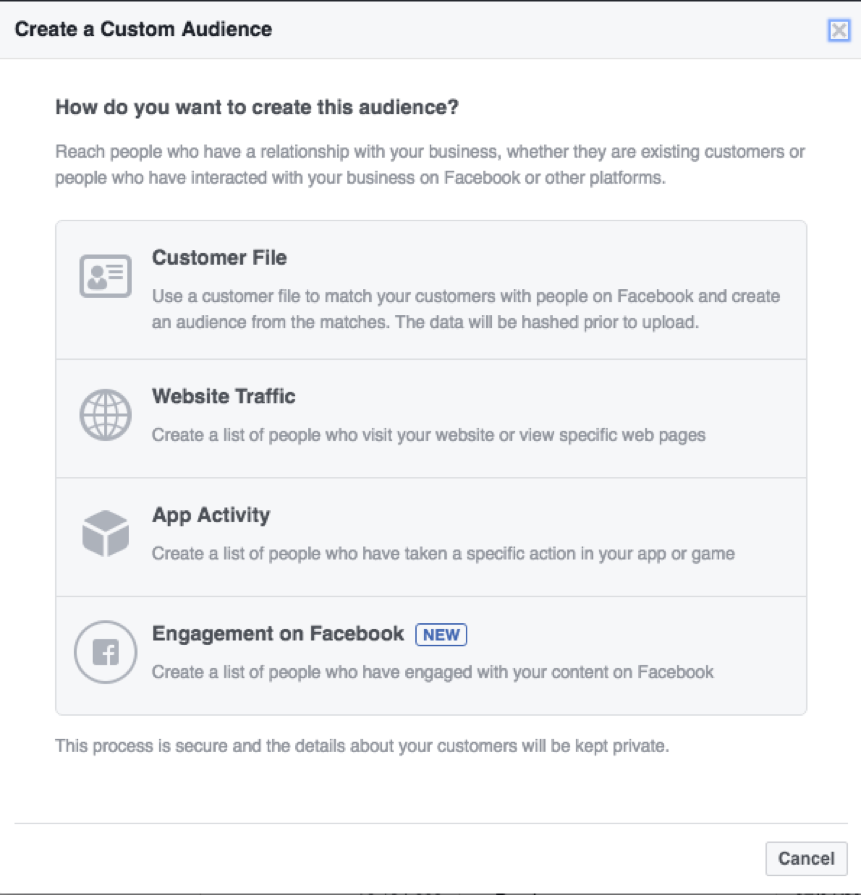
Head over to your Ads Manager and select the Audiences tab. From there, click on Create Audience and choose the Custom Audiences option.

2. Choose Website Traffic
You’ll then be taken to a screen that asks you to select what kind of Custom Audience you want to create. For a remarketing campaign, you’ll choose the Website Traffic option.
3. Select Your Target Audience
Then it’s time to laser-focus that targeting. Here, you can choose whether you want to target:
- Anyone who visits your website
- Users who have visited specific pages on your site
- People who have visited certain pages by not others
- User who haven’t been on your site in a certain period of time
- Custom Combination (that’s where you can use the events fired on your site – really powerful)
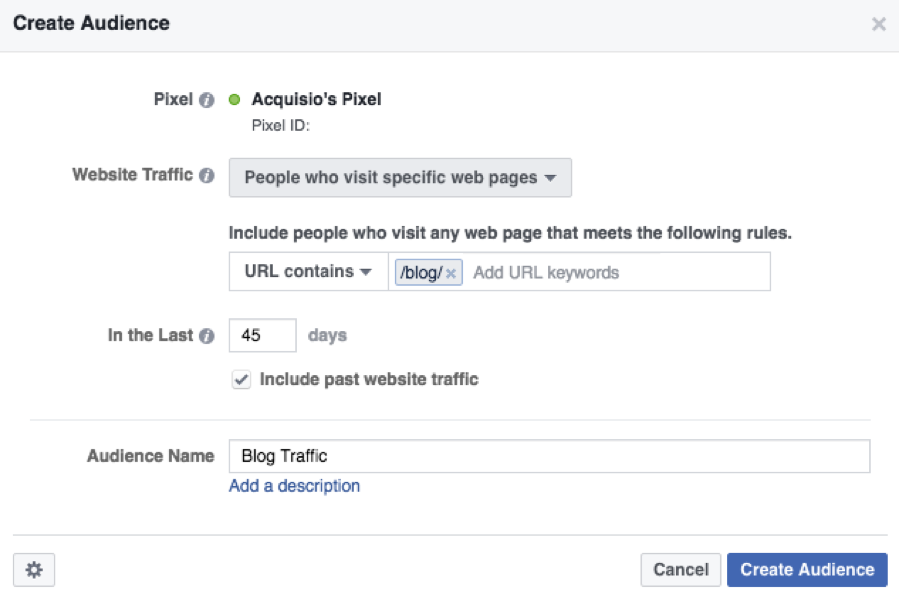
Now, you have your audience all set to go.
Dynamic Ads – What Are They and How Do You Use Them?
If you’re an eCommerce site running a remarketing campaign, the chances are you’re looking to make more sales.
Facebook’s dynamic ads are perfect for this because they create fluid sets of ads that change depending on the user and their previous actions on your site.
Basically, the dynamic ads can pick up the products your website visitors are interested based on their past actions and generate ads that tie into those needs. It’s very powerful.
How Dynamic Ads Work
Dynamic ads essentially flag important information about your products (like image, price, name etc) and link that up with Facebook’s ad system which can create multi-pane ads.
The information is pulled directly from your site, which means everything is correct, but Facebook can go one step further than that. It can understand information about certain products in your catalog (which we’ll talk about in a minute) and target ads using those very products to people who have searched for them in the past.

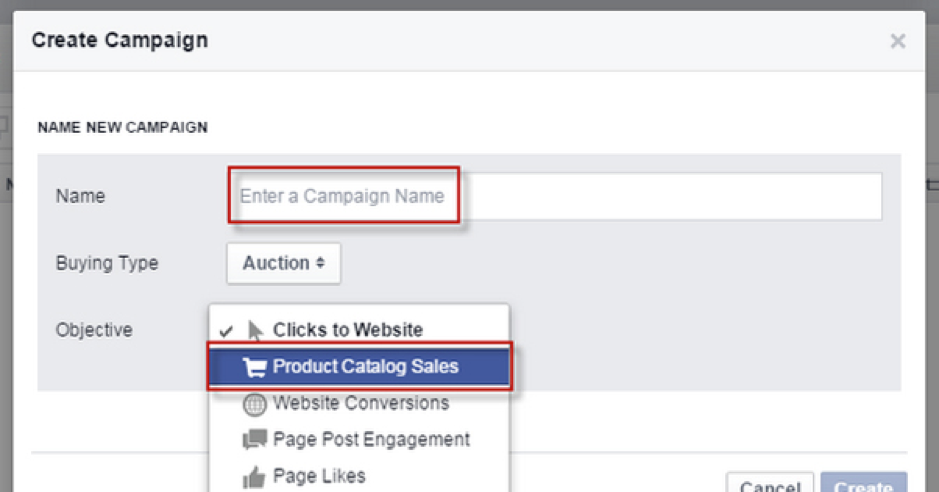
How to Set Up a Dynamic Ad
1. Create Your Product Catalog
First of all, you want to provide Facebook with all your product data. To do this, you can either direct Facebook to a generated feed file, or you can upload a .csv file that includes all your product data.
Remember to include:
- Your product ID
- The availability of your product
- The condition of your product (new, used, etc)
- A description
- An image link
- A direct link to the product page
- A title for the product
- The product price
- The brand of the product
Once you’ve done that, it’s time to determine who to target with your dynamic ads.
Sounds complicated? It doesn’t have to be – use our dedicated plugin
We have a plugin that creates a catalog WooCommerce XML feed automatically for you. As well as taking out the complicated process of describing all your products, it filters them based on category, tags, and stock, and it lets you add two supplementary images for ads carousels and single product ads. The feed will auto-regenerate, so your catalog will always be up to date.
2. Set Up Your Dynamic Ad Pixel
For the purpose of making more sales, there are three key pixel events you can tap into:
- ViewContent – to target people who have visited a certain product page. The ID of the page they have visited must match the ID you uploaded in the .csv file.
- AddToCart – to target people who have added something to their cart but not hit the buy button. You can add this pixel to the Add to Cart page.
- Purchase – to eliminate people who have already purchased a product or, alternatively, market it to them again if it’s something they might want to buy in the future.
The PixelYourSite plugin takes care of all this. You just need to add your pixel ID and everything will be took cared of automatically.
3. Create Your Ad Templates
The final step of the process is customizing your message for each product. With dynamic ads, you can create an ad set that has the same layout, theme, and style, but that has varying copy depending on what it is you’re trying to sell.
Facebook’s dynamic ads let you map data fields within your product catalog to generate specific text placement in your ads – kind of like how Merge Fields works in Excel.
You are basically grabbing data out of your catalog (like the product name or price) and adding it to the ad. Within the ad set-up, you can alter the message of your ad, the name or title of your ad, and the description of your ad depending on the information entered into the product catalog.
There are several options that you can choose from:
- Viewed or Added to Cart But Not Purchased: Promote products from All Products to people who viewed or added those products to cart in the last X days
- Added to Cart But Not Purchased: Promote products from All Products to people who added those products to their cart in the last X days
- Upsell Products: Promote All Products to people who viewed the product set below in the last X days
- Cross-Sell Products: Promote All Products to people who purchased from the product set below in the last X days
- Custom Combination: Promote All Products to a custom audience based on how people interact with products
For a more detailed tutorial that shows you how to create dynamic ads, check out our video here.
Remarketing campaigns are perfect for eCommerce companies looking to make more sales. Not only can you serve ads to people who already know about you (because they’ve visited your website), but you can serve them specific ads based on the exact actions they’ve taken on your site.