
PixelYourSite Pro has a pretty useful feature that can help you target users that are really engaged with your site content. It’s called TimeOnPage event and can be enabled from the first tab of the plugin.
Update: The TimeOnPage event is currently disabled because of some modification with the Chrome Browser. We plan to release something to replace it soon.

Once this option is enabled, it adds a TimeOnPage event on every page of the site, tracking the time spent by the visitor, content_name and content_ids. For our future releases, we plan to add more parameters for this event in order to make it even more useful.
This must not be confused with the Facebook own new feature called “Custom Audiences based on time spent on your site”. This one has a totally different approach, calculating the overall time spent on site and giving you the possibility to choose between various tires, like top 5%, 10%, or 25% most active users. I suggest you to incorporated both approaches into your marketing efforts. Our own feature is best suited to target people based on time spent on a particular page.
The invisible event: How to test the TimeOnPage Event
You are probably used to test all the events on your site with Pixel Helper Chrome extension, but if you are looking for this event you will not see it. And you are not supposed to see it because this particular event is invisible for Pixel Helper. Why? Because it triggers only when the user leaves the page, and not before that. It works like this for an obvious reason: it has to track all the time spent on the page.
So how can you make sure that the event is working? The easiest way to do it is to check the event under the Events tab in the Facebook Admin. Once it is enabled on your site and you give Facebook some time to update its data, the TimeOnPage event will be listed there.
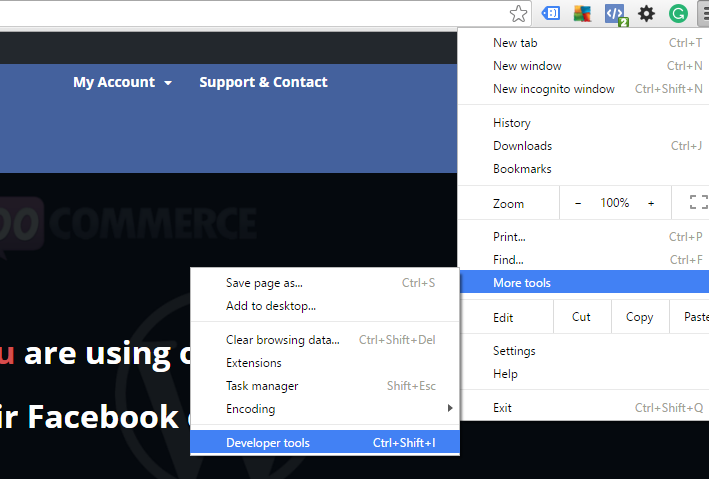
Another way to test the event (and make sure it works on a particular page) is to use Chrome Developer Tools. Open the site or the page you want to test in Chrome Browser, click on the top right menu > More tools > Developer tools
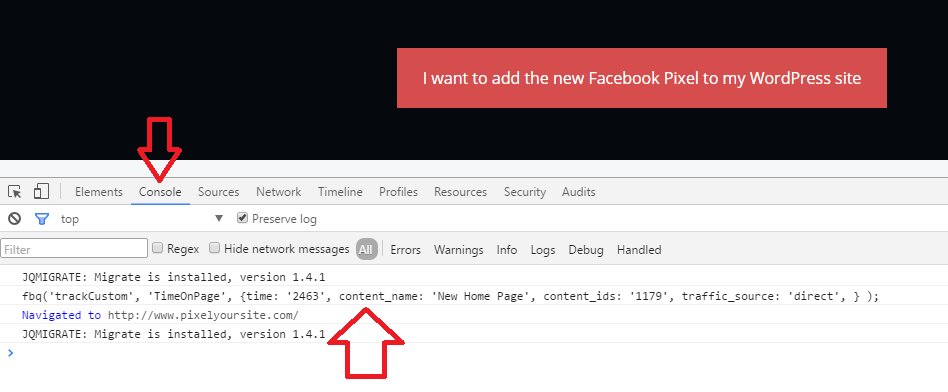
Once the console is opened, leave the page by clicking on a link or perform any similar action. You will see the event being tracked in the console:
How to use the TimeOnPage Event for Custom Audiences
The main purpose of this event is to be used for Custom Audiences, but it can also be a part of an advanced ads optimization strategy (that will be explained in this article). It’s obvious that the less time someone stays on a page, the less interested that person is in the content you offer and fewer chances there are for that person to convert. If the time is dramatically low, let’s say less that 10 seconds, it probably makes a lot of sense not to retarget that user with your future ads.
Example:
Let’s say you have an important offer page on your website. You have various campaigns and strategies to send people to that page. As it often happens, not all the users landing on your offer page will convert from the moment one. You know this, and that’s why you have a retargeting campaign running. You have a Custom Audience build for that important ABC Offer Page and you are running ads against it. This is common sense, and every mature marketer has a few of this campaign running. But, if the visitors of that key page are spending only seconds on it, chances are that they have a low interest in your offer and will never convert. Maybe you have a video there, and you want them to watch it fully, or at least for a specific amount of time.
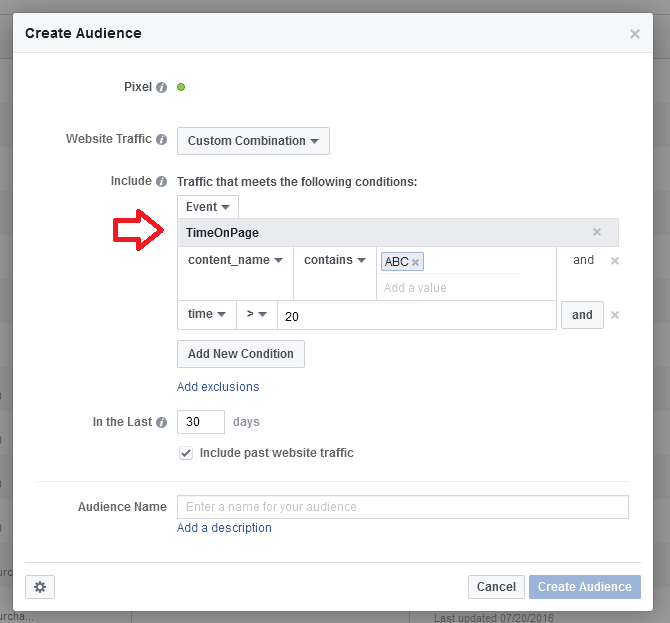
In order to retarget only the highly engaged users, you can create a Custom Audience with the help of TimeOnPage event, formed only from visitors that spent at least 20 seconds on the ABC page.
Go to Create Audience > Custom Audience Website Traffic > Custom Combination > Events > TimeOnPage > content_name: ADC Offer Page, time > 20
You can also create a Custom Audience from people that spent less than 20 seconds on page ABC and exclude them from any further retargeting campaigns (or target them with some particular ads, just to see how it goes: Hey, you run away pretty fast from our site, here it is what you’ve missed!)
Of course, that’s just an example and you can come up with your own strategies.
Optimize your ads for TimeOnPage Event – an unusual approach
Sometimes just sending people to a page is not enough. You want to make sure that they read your message or that they watch your videos. Knowing that is complicated, but you can make some deductions. If the video you have on the page is 3 minutes long and a visitor spends only 15 seconds there, is pretty obvious that your objective was missed. Not only that you might want to create separate retargeting strategies for someone who didn’t spend enough time on a key page in order to get your message, but you can also make sure that such a fast leaving visitor isn’t considered a conversion.
Custom Conversion based on TimeOnPage Event
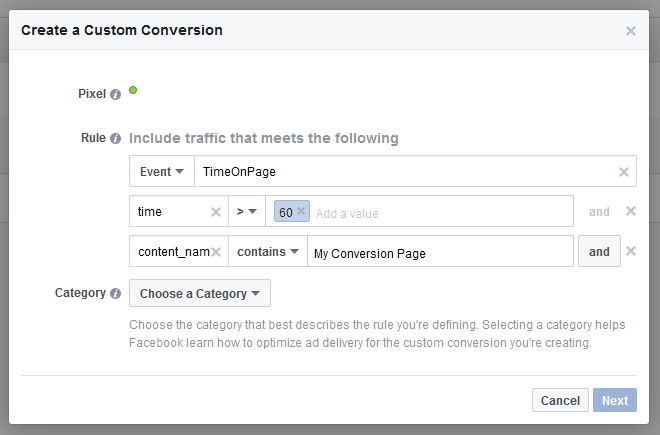
Open Custom Conversion menu and click on Create Custom Conversion. Choose Event as the rule, then select the TimeOnPage event. Ad time parameter with a value in seconds bigger that the time you consider to be a conversion. Add the content_name parameter with the conversion page title as the value (this is very important). Click Next and give a meaningful name to the custom conversion (60+ sec on Page Name).
You can now use this Custom Conversion when you create new ads optimized for increase conversion on your website. Make sure that you include this in your custom reports as well, in order to correctly track the performance of the campaigns based on it.
TimeOnPage Event and bouncing users – a limitation
While this PixelYourSite feature is useful and can be successfully integrated into various sophisticated strategies, it does have one important limitation. Because of the way it works, you can not use it with ease to exclude bouncing users.
The TimeOnPage event is triggered every time a page is left and measures the time spent on each page, and not on all site. Because of this, it is impossible to define a bouncing user based on it. It can be that a visitor enters the site, stays 1 minute on a page than 10 seconds on another page. This is clearly not a bouncing user. That’s why creating a global audience from the TimeOnPage event with the time parameter being less than x seconds and excluding it from retargeting campaigns will not work as desired. It can exclude visitors with a legitime interest in your content.
You can, however, create a positive audience of people that spent at least x seconds on the site. This audience will exclude bouncing users by default and can be successfully retargeted with ads.
Conclusion
Experiment with the TimeOnPage Event. Create important Custom Audiences for key pages targeting only people that spent enough time in order to fully get your message. Retarget the visitors that left in a hurry with a special campaign to recapture their attention. If required, optimize your ads for a Custom Conversion that includes a time on page condition. Create a Custom Audience of highly engaging people that spent at least a certain number of seconds on your site page and retarget it.
When it comes to Facebook ads, experimenting is the key. Trying a few of these strategies can prove to be profitable for your business.